
Handbag Designer
The Handbag Designer is BeadMod's panel-based workspace for building structured beaded bags. It is currently labelled Beta. You paint or place beads on flat panel grids, inspect the assembled result in 3D, and save the design to your dashboard.
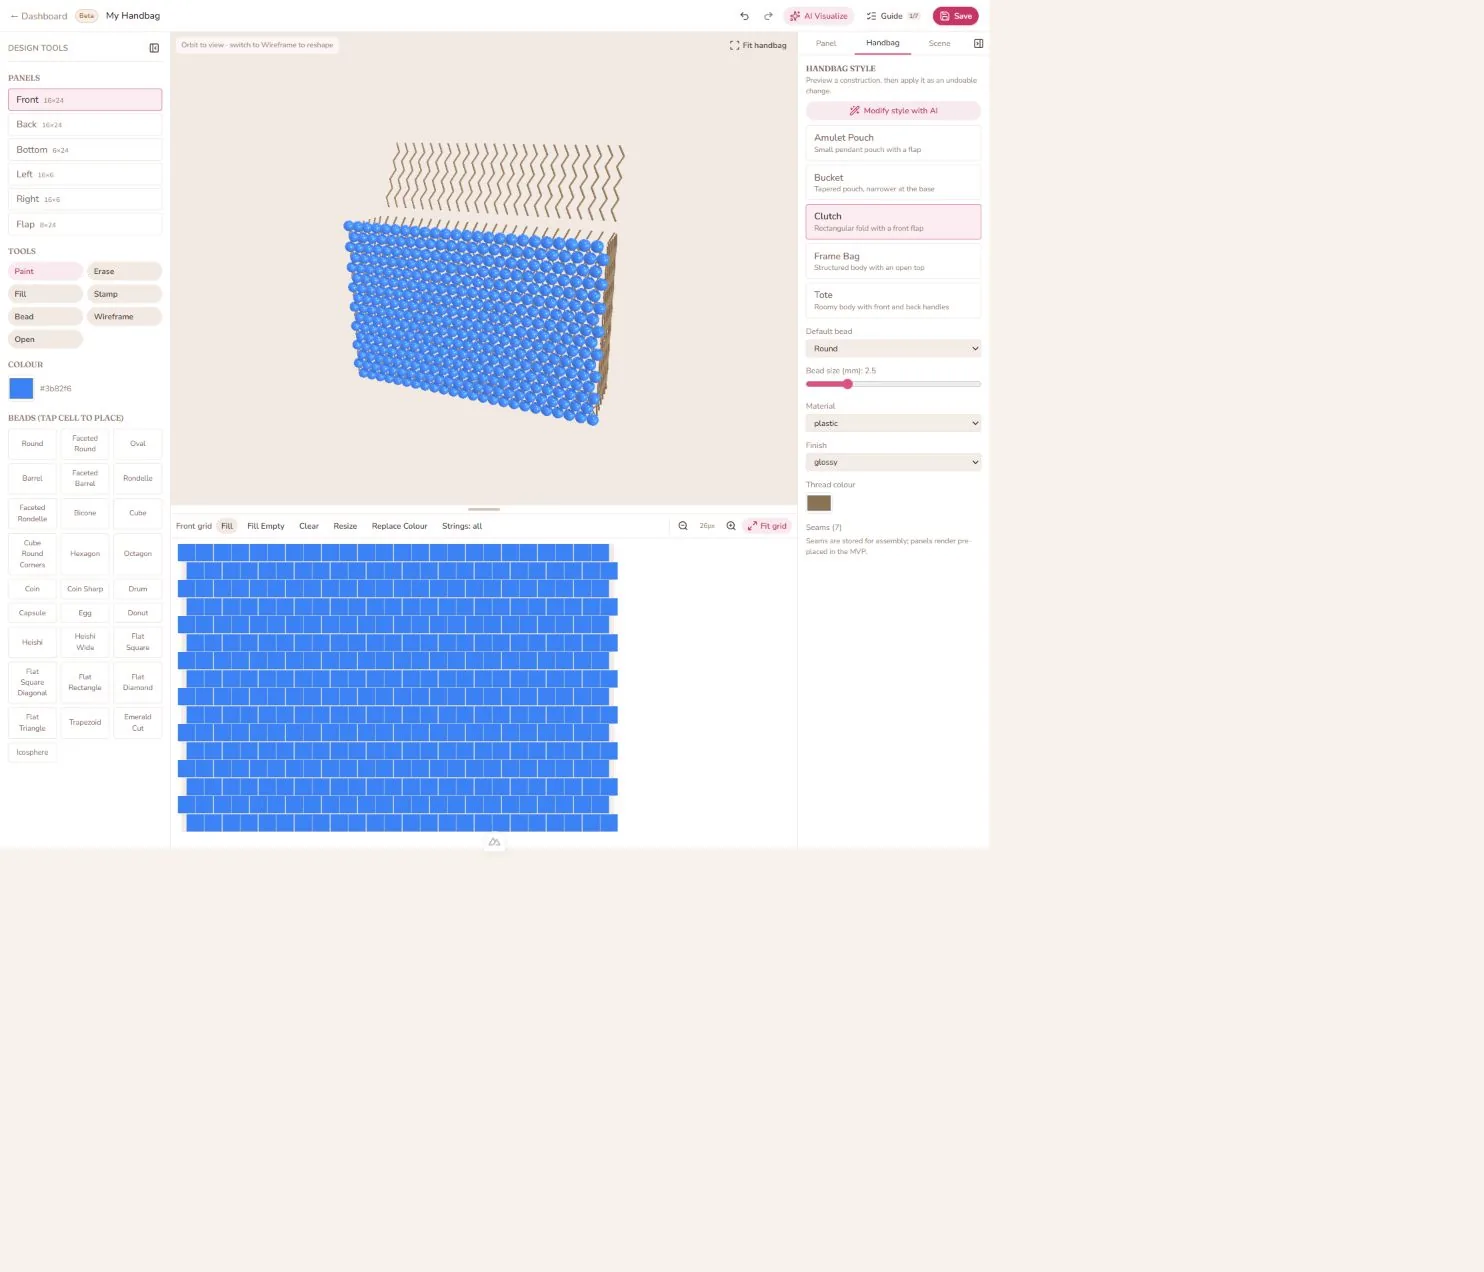
Live UI snapshot captured from the local app on August 26, 2026. The filled example was created temporarily and was not saved.
Open the designer
- Open My Studio from the dashboard.
- Choose Handbag Designer and select Create new.
- The editor opens with a starter construction, a Front panel, and the first-design guide.
The editor has three areas:
- Design tools on the left: panel selection, editing tools, colour, stamps, and surface-safe bead models.
- Preview and grid in the centre: the assembled 3D view above the active panel's 2D grid.
- Design settings on the right: Panel, Handbag, and Scene tabs.
Choose a construction
Open the Handbag tab in Design settings. The curated style library includes:
| Style | Construction |
|---|---|
| Clutch | Rectangular fold with a front flap |
| Amulet Pouch | Small pendant pouch with a flap |
| Frame Bag | Structured body with an open top |
| Tote | Roomy body with front and back handles |
| Bucket | Tapered pouch, narrower at the base |
Select a style to preview its construction. Applying a different style is an undoable change and opens a confirmation step so you can cancel safely. Modify style with AI accepts a plain-language description and returns a validated style proposal for review.
Work with panels
The starter clutch shows six editable panels:
- Front — 16 × 24 cells
- Back — 16 × 24 cells
- Bottom — 6 × 24 cells
- Left — 16 × 6 cells
- Right — 16 × 6 cells
- Flap — 8 × 24 cells
Other styles can use different dimensions. Select a panel in the left rail, then edit the active panel in the grid below the 3D view.
Panel settings
The Panel tab shows the active panel and its grid size. It also contains the Stitch pattern selector:
- Peyote — alternating rows
- Brick — alternating rows
- Loom — aligned rows
- Square — aligned rows
For a flap, the Panel tab also provides bend controls. Use the Bend tool to place a fold row, or enter a row and angle directly. Switch Open to Closed in the left tools to preview a flap folded over the front.
Paint, place, and fill
Use the left-side tools to choose the edit mode:
- Paint — apply the selected colour across cells or strokes.
- Erase — remove beads from cells.
- Fill — cover the active panel with the selected colour and default bead.
- Stamp — place a reusable pattern fragment.
- Bead — choose a specific model, then tap a cell in the grid to place it.
- Wireframe — show the construction handles and reshape the 3D preview.
The active grid toolbar also includes Fill, Fill Empty, Clear, Resize, and Replace Colour. The string toggle switches between Strings: all and Strings: beads only so sparse panels and flap endings are easier to inspect.
All editing actions are undoable. Use the toolbar buttons or Ctrl+Z / Ctrl+Shift+Z (Cmd instead of Ctrl on macOS).
Beads and stamps
The Handbag Designer offers a curated set of models that sit cleanly on a flat panel, including round, faceted round, oval, barrel, rondelle, bicone, cube, polygon, disc, flat, and other shapes. Choose a model under Beads (tap cell to place), then choose the Bead tool and tap cells.
Choose Stamp to open the reusable stamp library. You can:
- Select a stamp to preview it on the grid.
- Place it on the active panel.
- Create a new stamp from a small grid.
- Rename or delete stamps from the stamp card.
The library is synced across devices when cloud storage is available. If syncing is unavailable, the editor indicates that the stamp is saved on this device.
3D preview and workspace layout
- Drag the 3D preview to orbit around the bag.
- Select Fit handbag to frame the construction again.
- Use Wireframe when you need to reshape or inspect panel geometry.
- Drag the horizontal divider between the preview and grid to change their proportions.
- On smaller screens, open the tools or settings drawer from the header. Sidebars can also be collapsed on desktop.
The current MVP stores seam relationships for assembly and renders the panels in their assembled positions. Seam editing is therefore represented in the model, while the visible work surface remains the per-panel grid.
Handbag settings
In the Handbag tab you can change:
- Construction style
- Default bead model
- Bead size
- Material: plastic, glass, metal, wood, stone, pearl, or translucent
- Finish: glossy, polished, matte, frosted, faceted, brushed, or hammered
- Thread colour
- Saved seam count
The Scene tab controls the environment, lighting intensity, bloom, and camera reset.
Save, recover, and visualize
Click Save in the header to store the handbag in your account. A saved handbag can be reopened, duplicated, filtered in the dashboard, and managed from the Gallery along with its captures and AI visualizations.
The editor keeps a local draft while you work. If a page reload interrupts an unsaved change, the next visit can offer to recover the newer draft. Review the recovered state before saving it.
AI Visualize first makes sure the current handbag revision is saved, then opens design-aware scene categories and presets. It can use the 3D design as a structural reference, and generated images are linked to the handbag in the Gallery. AI generation uses tokens; check the token balance in the dashboard before generating.
First handbag guide
The Guide button opens a seven-task checklist:
- Choose a handbag style.
- Place one bead.
- Choose a stitch layout.
- Fill the active panel.
- Inspect the 3D preview.
- Save the design.
- Explore AI visualization.
The checklist completes tasks when the underlying editor action succeeds. It can be minimized, dismissed, resumed, or practised again later.
A practical first workflow
- Choose Clutch, Bucket, or another construction in the Handbag tab.
- Set the stitch pattern for the active panel.
- Pick a colour and use Fill to establish a base.
- Switch to Paint or Bead to add accents.
- Use Back, Bottom, Left, Right, and Flap to complete the construction.
- Use Fit handbag, orbit the preview, and inspect the 3D silhouette.
- Save the design before opening AI Visualize or leaving the editor.
Related guides
Last reviewed: August 26, 2026